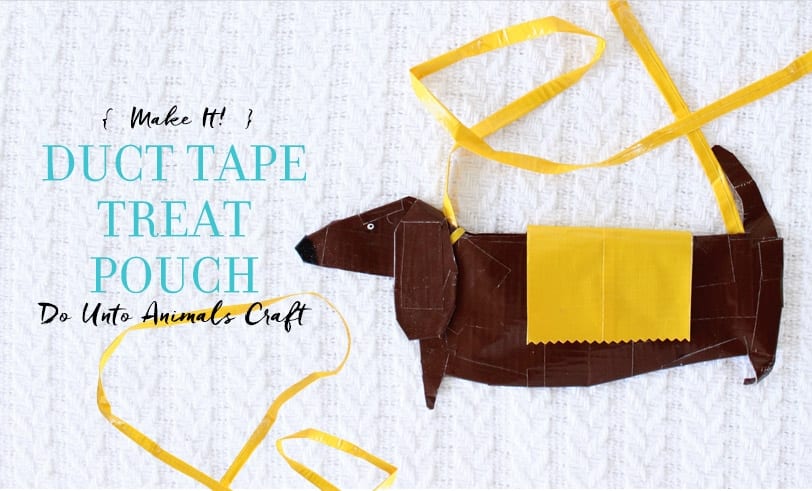
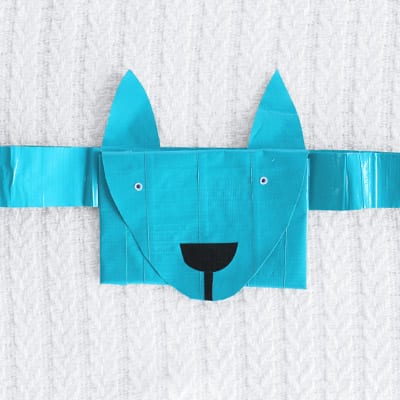
Make It! Duct Tape Treat Pouch
We can have lots of fun teaching tricks to our dogs, but some tricks have more importance than others. Teaching your dog the “touch” cue is an essential tool needed to keep your dog safe. On Pages 46 & 47 of Do Unto Animals, Tracey gives us a run-down of the 7 simple steps for teaching your dog to “touch,” a skill that she believes is crucial for your dog to have in order to “prevent any dangerous or dicey situations, like wandering into oncoming traffic, approaching an unfriendly dog, or stealing your friend’s sandwich.”If you’re interested in learning the “touch” cue, pick up a copy of Do Unto Animals and try it out for yourself. We promise it will be equally as fun as it is important.
** More information and illustrations of the “touch” cue can be found in Do Unto Animals **
When our dogs are learning to train and begin to answer our call around the house, it’s important that we reward them with special treats to encourage their good behavior. One thing we need in order to teach “touch” effectively is a good treat pouch. We like to use one that fits nicely around our waist so that our hands are free to teach. These duct tape treat pouches by Jodi Levine will stand up to any doggy slobber and will stay intact through the wear and tear bound to happen around our pets in training. They’re also just really, really cute!
WHAT YOU NEED:
Directions and supplies below are to be used for making the blue fanny-pack treat pouch.
- Colored duct tape: blue, black, white
- Scissors
- Self-adhesive Velcro dots
- Hole punch
- Black marker
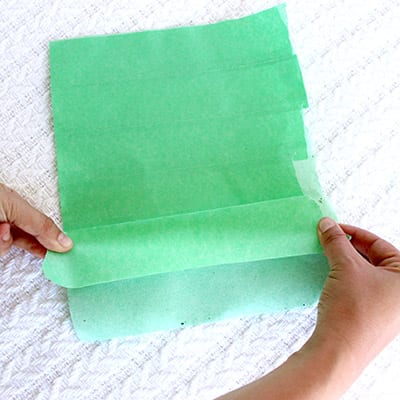
CREATE DUCT TAPE FABRIC:
1. STICK strips of duct tape together with sticky sides touching. One strip covers just half of the other widthwise, leaving half of the strip’s sticky side exposed.
2. LAY another strip of tape on top of the exposed sticky strip. Again, leave half of the new strip’s sticky side exposed. ADD more strips of tape this way until you have a sheet the size you want.
3. FOLD the remaining flaps of tape to finish the sheet. TRIM the edges of the fabric with scissors to make them even and to form a rectangular fabric shape.
MAKE YOUR TREAT POUCH:
4. TRI-FOLD your duct tape fabric to make three panels. The middle panel and the right panel should be 5 inches long, the left panel should be slightly longer at 7 inches long.
5. TRIM the edges of the longest panel into a U-shape. This will be the closing flap (the dog’s snout).
6. TAPE the sides of the two 5-inch panels together using the same color duct tape. This forms the pouch. Leave the U-shape panel loose.
7. ADD ears by folding a piece of duct tape in half so that sticky sides touch and CUTTING two triangle shapes. TAPE them on top of the pouch as ears.
8. CUT a nose shape out of black duct tape and STICK it on to the snout. USE a hole punch to make two eyes out of white duct tape and STICK them on the face. DRAW two dots for pupils using your black marker.
9. ATTACH an adhesive velcro dot inside he snout so that the pouch can close.
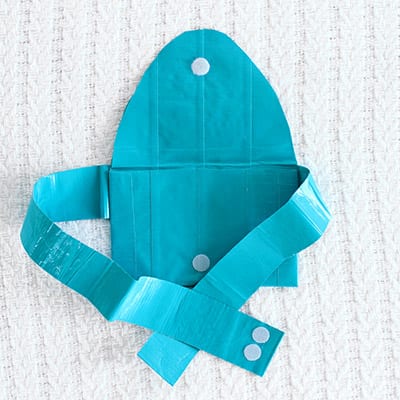
MEASURE A WAISTBAND ATTACHMENT:
10. MEASURE your waist and CUT two strips of duct tape to size.
11. STICK the two strips together, sticky sides touching, to make the waistband.
12. TAPE the pouch securely to the center of the waistband.
13. ADD two adhesive velcro dots to the ends of the waistband as a clasp to wear around your waist.

JOIN OUR EMAIL LIST
Sign up to get updates fromHey Friend Foundation